Introduction
Maintaining your Nintendo Switch is essential for ensuring optimal performance. A critical component of this maintenance is cleaning the fan, which plays a pivotal role in cooling the device, thereby preventing overheating during intense gaming sessions. Ignoring fan care can lead to performance issues and potentially damage the console. In this guide, we walk you through the steps to clean your Switch fan safely and effectively, helping you maintain your device for years of seamless gaming.
Understanding the Nintendo Switch Fan
Before we dive into cleaning, it helps to understand what the fan does and why it needs regular attention.
Role and Function of the Fan
The fan in your Nintendo Switch regulates the device’s temperature by dispersing heat generated during gameplay. Without a functioning fan, the console could overheat and slow down or shut down unexpectedly.
Signs That Your Fan Needs Cleaning
How can you tell when the fan requires cleaning? Look for signs such as increased noise levels, overheating warnings, or a noticeable drop in performance. If your console feels unusually warm during gameplay, dust or debris may be clogging the fan.
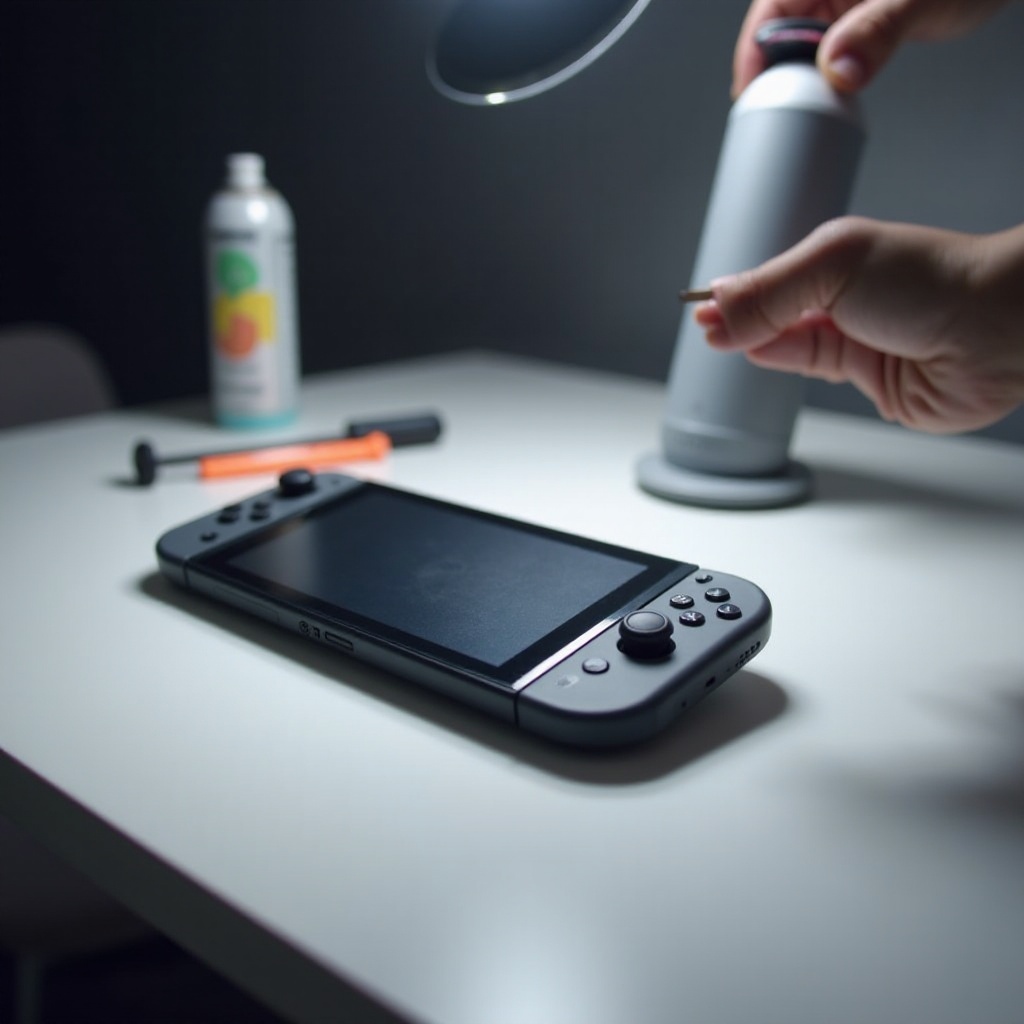
Tools and Materials Needed for Cleaning
To effectively clean your Nintendo Switch fan, gather these essential tools:
Essential Tools List
- Small Phillips head screwdriver
- Compressed air can
- Microfiber cloth
- Soft brush (optional)
Optional Accessories for Better Results
- Tweezers
- Isopropyl alcohol
- Cotton swabs
Having these tools ensures a thorough cleaning without causing damage to your console.
Preparing Your Nintendo Switch for Cleaning
Proper preparation is crucial for cleaning your Nintendo Switch fan safely. Follow these steps:
Initial Steps for Safety
- Completely power off your Nintendo Switch.
- Disconnect all cables and accessories.
- Work on a clean, static-free surface.
These initial steps ensure your safety and prevent damage to the console during the cleaning process.
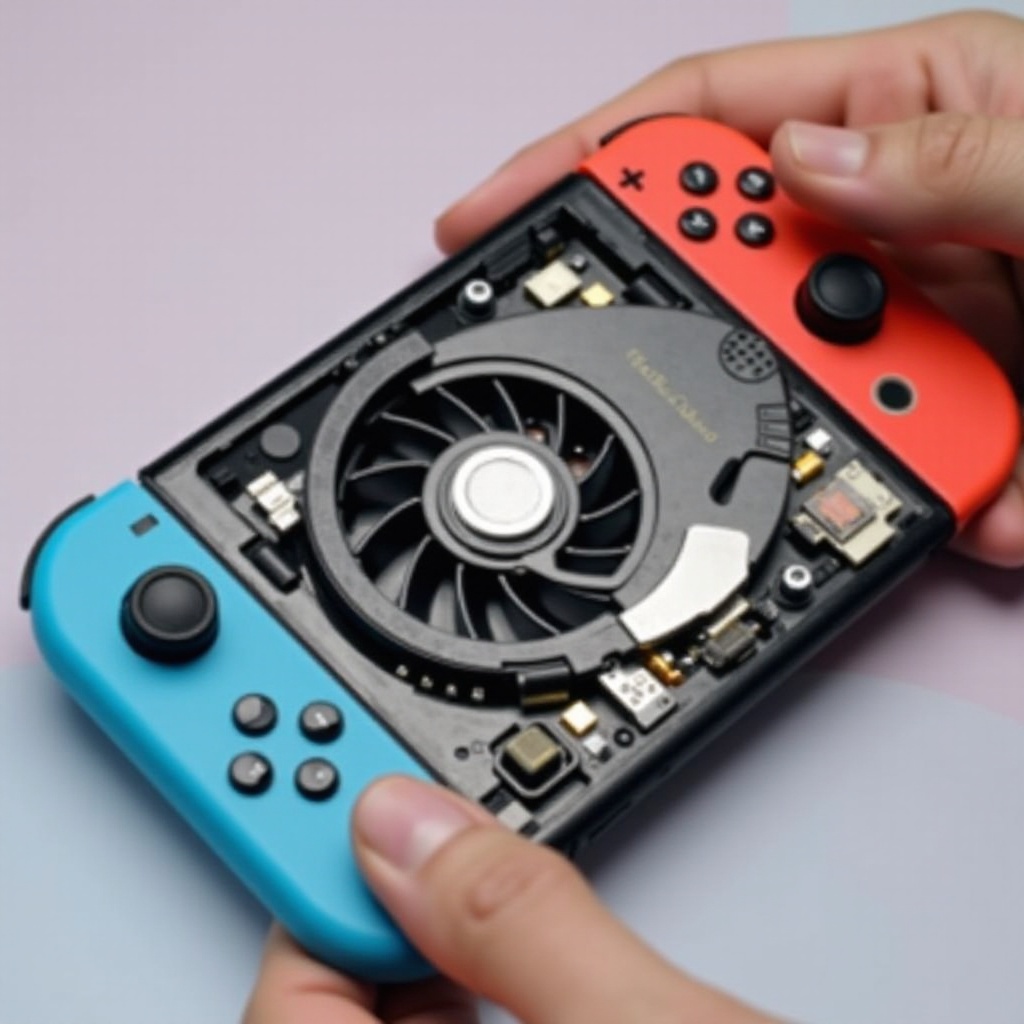
Disassembling Your Device (If Necessary)
You may need to remove the back cover to access the fan more thoroughly. Use a small Phillips head screwdriver to carefully remove the screws and open the back panel. Store the screws safely, as you’ll need to reattach them later.
Step-by-Step Guide to Cleaning the Fan
With preparation complete, you’re ready to clean the fan. Here’s how:
Accessing the Fan
If you haven’t removed the back cover yet, do so now. Locate the fan, usually near the center of the device.
Cleaning Techniques and Tool Usage
- Use the compressed air can to gently blow away dust from the fan blades. Keep the can upright and a few inches away to avoid moisture discharge.
- For stubborn dust, gently dislodge particles using the soft brush. Avoid applying too much pressure.
- If you see grime, dampen a cotton swab with isopropyl alcohol and gently wipe the fan blades.
These techniques will help remove dust and debris effectively.
Reassembly and Testing
Once the fan is clean, reassemble your Nintendo Switch:
- Securely reattach the back cover with the screws.
- Reconnect all cables and accessories.
- Power on your device to test its performance. A quieter fan and cooler running console indicate successful cleaning.
Do’s and Don’ts of Cleaning Your Nintendo Switch Fan
Following these guidelines will help prolong your fan’s life and improve performance:
Common Mistakes to Avoid
- Do not apply excessive force to the fan blades.
- Steer clear of water or non-recommended cleaning solutions.
- Never blow into the fan with your mouth; use compressed air instead.
Recommended Practices
- Clean your fan every few months or when you notice performance issues.
- Store your console in a dust-free area when not in use.
Additional Tips for Console Maintenance
Routine maintenance can keep your Nintendo Switch running at its best. Besides cleaning the fan, consider these practices:
Creating a Dust-Free Environment
- Use a protective cover when not gaming.
- Keep your gaming area clean and free of debris to reduce dust accumulation.
Setting up a Regular Maintenance Schedule
- Check your fan and other components regularly.
- Clean external parts like screens and controllers frequently.
When to Seek Professional Help
Sometimes, even with diligent cleaning, you may face issues that require professional assistance. If cleaning doesn’t solve performance problems or if you encounter hardware issues, it might be time to consult an expert.
Identifying Major Issues
- Persistent overheating warnings
- Unusual noises from the fan post-cleaning
Choosing a Reliable Service Provider
- Look for authorized repair centers with positive feedback from prior customers.
- Ensure the service provider specializes in Nintendo Switch repairs.
By following these steps and tips, you can enjoy a smooth and enjoyable gaming experience on your Nintendo Switch.
Conclusion
Regular cleaning of the Nintendo Switch fan is crucial for maintaining your console’s efficiency and longevity. The steps outlined in this guide will help you achieve this, ensuring that you can continue enjoying your gaming experiences without interruptions. Consistent maintenance and proper cleaning techniques will keep your device in top form, preventing potential issues down the road.
Frequently Asked Questions
How Often Should I Clean My Nintendo Switch Fan?
It’s recommended to clean your fan every three to six months, depending on usage and the environment.
Can I Use Compressed Air on the Fan?
Yes, using compressed air is a safe and effective way to remove dust from the fan blades without contact.
What Should I Do if My Switch Overheats Even After Cleaning?
If overheating continues after cleaning, seek professional repair services to diagnose potential hardware issues.